For those people that know me, they know that I have a bit
of a collection of old window frames and shutters.
And much to my husbands relief I finally broke down and used one in a project.
of a collection of old window frames and shutters.
And much to my husbands relief I finally broke down and used one in a project.
Unfortunately though, I didn't take a photo of the window frame before I painted it.
It was a creamy white color and it was actually in pristine condition.
I wanted something a little more worn and aged looking.
So first I painted it with Miss Mustard Seeds Milk Paint in Flow Blue.
But there was no cracking, peeling or flaking like I hoped there would be.
So I helped it along here and there (see my earlier post "Tips On Using Milk Paint").
 |
| Then I sanded it in a few spots sometimes just down to the white paint and other times I took it further, down to bare wood. |
 |
| Then I waxed it with Miss Mustard Seeds antiquing wax in some strategic areas and used regular wax on all other areas. |
Now for the panels. I cut two panels to size from 1/4" plywood. I used an MDF board for the blackboard panel. I found this worked much better than regular plywood for two reasons:
1- there is no grain that will show through under the chalkboard paint and therefore only requires one coat
2- because there is no grain I don't have to prep the surface or even sand it after painting!
 |
| Here it is with just one coat. Looks great doesn't it? |
 |
I also added a little ledge for chalk that I made out of
some old trim, just under the panel on the frame.
Had to paint and distress this too of course.
|
 |
| Next I took one of the plywood panels and glued some batting on. Trimming it a little on all edges to prevent too much bulk, which would make it harder to mount in the frame. |
 |
| Then I covered the batting with some burlap fabric. Glued it in place with hot glue. I then put some stretchy net fabric over the burlap, purposely placing the netting randomly with folds here and there to give a more natural look. Tacked it in place here and there with glue. |
 |
| I painted and waxed the back of all the panels. This panel I even glued on trim to finish off the edges of the burlap. |
 |
| The panels are held in the frame with metal offset clips. |

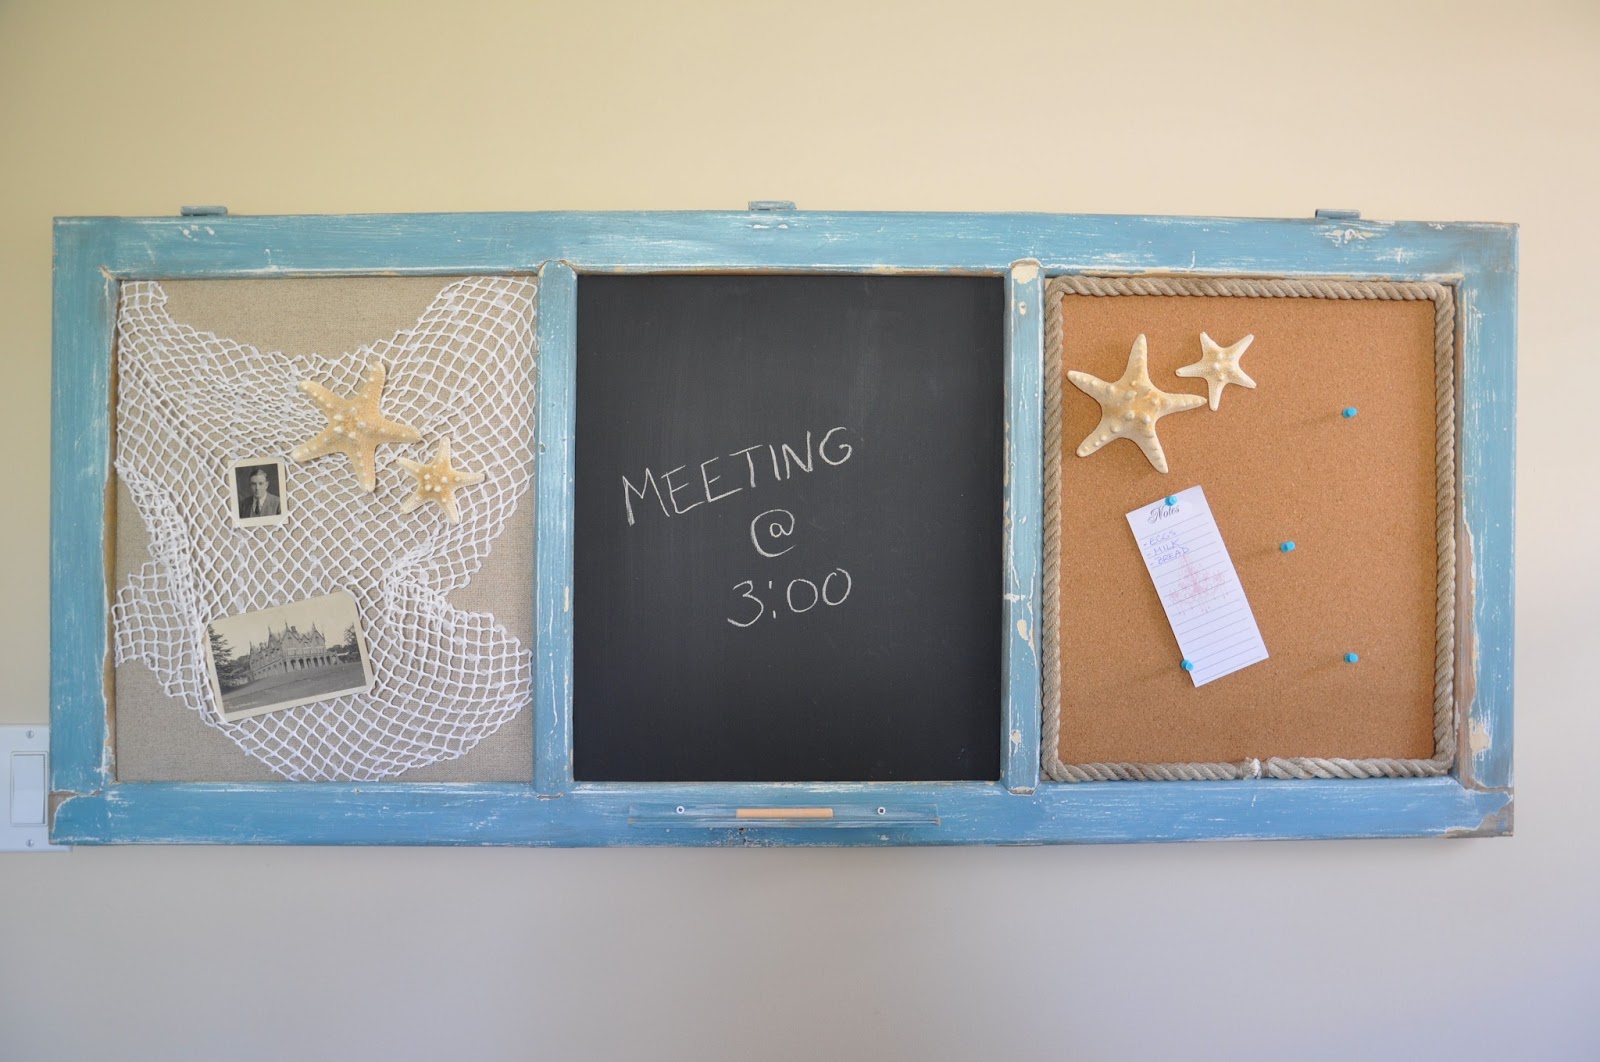
Now photos and cards can be tucked into the netting.
Finally I glued on some starfish.
Next panel I used contact cement to glue on a sheet of cork I had cut to fit the panel.

I fitted the panel into the frame with the offset clips and
then glued some old fishing rope around the inner edges.
(I had to bind the cut ends of the rope with heavy duty thread
and a bit of glue to prevent unraveling).
Then I glued on some more starfish for overall balance and to jazz it up a bit.
Then all I had left to do was to put hanging hardware on the back.
And Voila!
I am happy with the outcome. And I actually sold this piece to a shop downtown :0)
(See Honey I am not becoming a hoarder!)
I linked to the party at:


Seeing the original frame and now the transformation. Quite the look! A beautiful piece that anyone would be proud to put on their wall. Well Done!!
ReplyDeleteThanks so much for your kind words. I had a lot of fun making this one, and I have a lot more window frames so keep checking back to see what I make with those.
Delete